Photo to Perler Bead Pattern: Free Converter Tutorial (No Signup)
Convert any photo to a perler bead pattern free — grid size, color count, real Perler/Hama/Artkal color matching, bead shopping list and printable PDF. Step-by-step.
Turning a photo into a perler bead pattern is the most requested fuse bead skill — custom bead portraits sell for real money on Etsy — yet the conversion itself takes minutes with a free fuse bead pattern maker. This tutorial walks through the exact pipeline: choosing a photo, picking a grid size, cutting the color count, matching to real Perler/Hama/Artkal colors, and printing a chart with a bead shopping list. No account, no watermark, nothing to install.
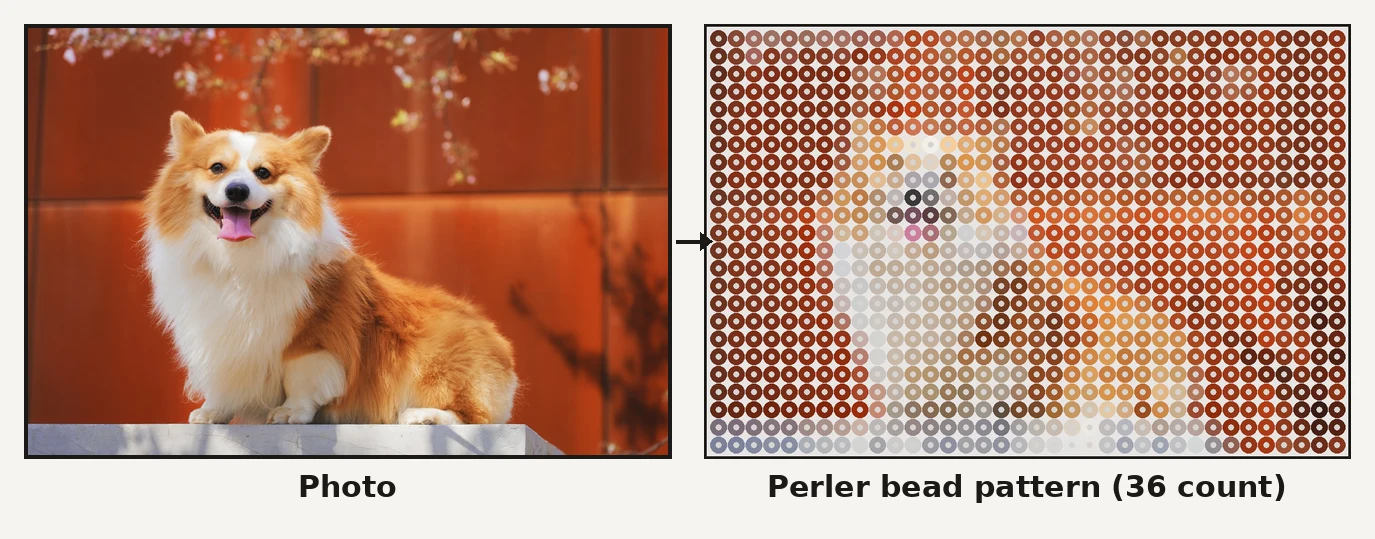
What does a photo to bead pattern converter do?
It resizes your photo to a bead grid and matches every cell to the closest color from a real brand catalog — Perler, Hama, Artkal, MARD or Nabbi. You get three outputs: a pixel preview of the finished piece, a bill of materials telling you exactly how many beads of each color to buy, and a printable pattern chart. One pattern cell = one 5mm bead on your pegboard.
Step 1: Pick a photo that converts well
The conversion amplifies whatever the photo already is. The best inputs have:
- Strong subject-background contrast — a light pet on a dark couch, or vice versa
- One clear subject filling most of the frame
- Even lighting — hard shadows become muddy blobs at 24 colors
Crop tighter than feels natural; you can adjust brightness, contrast and saturation during conversion with live preview on the pattern itself.
Step 2: Choose the grid size (it sets the physical size)
Every cell becomes one bead, so grid = finished size on standard 5mm midi beads:
| Grid size | Finished size | Effort |
|---|---|---|
| 16×16 | 8 × 8 cm | one evening |
| 29×29 (one square pegboard) | 14.5 × 14.5 cm | a weekend |
| 36×36 | 18 × 18 cm | a weekend |
| 58×58 (4 pegboards) | 29 × 29 cm | a serious project |
First photo pattern? Start at 29×29 or 36×36 — enough resolution for a recognizable face or pet without a multi-week commitment. The corgi pattern above is 36 wide.
Step 3: Cut the color count
Photos contain thousands of colors; bead boxes hold dozens. The color budget is the setting that most changes the result:
- 12–16 colors — clean cartoon look, easiest to place. Best for logos and simple markings
- 20–24 colors — the portrait sweet spot; skin and fur keep depth while staying sortable
- 32+ colors — photorealistic, but you're buying specialty colors and squinting at the chart
Start at 24 and adjust by eye: if two neighboring tones look identical on screen, they'll be indistinguishable in beads — drop the count until every color earns its slot.
Step 4: Match to real bead colors (Perler vs Hama vs Artkal)
Beads come in brand-specific color codes, not RGB values — a pattern full of colors you can't buy is useless at the craft table. Each brand's catalog is different:
- Perler — the US standard, ~50 core colors
- Hama — dominant in Europe, slightly different range
- Artkal — 199 S-series colors, the deepest catalog; best for skin tones and gradients
The perler bead pattern maker matches cell-by-cell against each brand's real catalog and switches between them, so the same photo yields a Perler chart or an Artkal chart with correct shopping lists for either. The photo to fuse bead pattern conversion is identical — "fuse beads", "perler beads" and "hama beads" all name the same 5mm iron-together medium.
Step 5: Print the chart and count your beads
A workable pattern needs the grid chart and a bill of materials. Counts matter more than beginners expect: a 58×58 poster is 3,364 bead placements, and running out of black halfway through means a week of waiting for shipping. The BOM turns that into a one-minute pre-flight check.
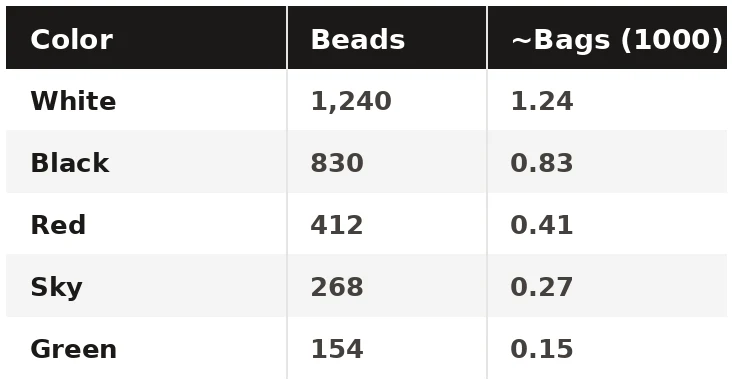
The full math — fill ratio, the 10% buffer, bag sizing — is in How many beads do I need?
Ironing tips for photo patterns
Photo patterns carry more single-bead color islands than geometric designs, so they're fragile at the iron stage:
- Medium heat, longer rather than hotter — fuse, don't flatten
- Iron the back first for portraits; the front stays crisper
- Cool fully before removing the tape — warm beads snap off with the tape
- Perforated tape method keeps the classic beaded look if you don't want a fully fused, flat finish
FAQ
Can I convert a photo of a person or a pet?
Yes — the same pipeline works for both. Budget 24+ colors and a 48×48+ grid if the face needs to be recognizable; pets with simple markings work at 29×29.
What about transparent or white backgrounds?
Most converters can key out near-white backgrounds so you're not placing 200 filler beads around a silhouette — in this maker it's one toggle.
Which bead brand should I buy?
Whichever your local craft store stocks — the pattern converts to any brand. Ordering online? Artkal's 199-color range handles portraits noticeably better than budget brands.
Is a free perler bead pattern maker really free?
This one is: no signup, no watermark, unlimited conversions, and images never leave your device — everything runs locally in the browser.
PNG or PDF — which should I download?
PDF for the weaving table (glyph-coded, board-by-board sections, printable); PNG for sharing the preview or posting the finished piece.
Make your first perler bead pattern
Open the free bead pattern maker, drop in a photo, set 29×29, 24 colors, and your bead brand. Toggle background removal if your subject has a clean edge — you'll have a printable chart and shopping list in under five minutes. For pure digital pixel art instead of beads, the same photo works in the image to pixel art converter with Game Boy and PICO-8 palettes.